Real-Time, Delta Refreshed Bi-Directional IMAGE-to-RDBMS
Is Heterogeneous Data Replication Just a Fantasy?
Taurus Software Make it Real
With BridgeWare.
Download file in pdf format
The HP3000 running IMAGE and other MPE-based legacy databases got there first. That’s why they hold decades of legacy manufacturing, sales transaction and customer data for companies everywhere. Trouble is, those companies are now turning to open environment products:
- To support Web Servers and provide customers and partners accurate information on inventory and order status in real time.
- To synchronize applications across platforms, so corporate departments are all working on the same page.
- To build and update a data warehouse frequently, so that staff can get current information to make better decisions faster
Until BridgeWare, all that IMAGE, KSAM or MPE data didn’t get into the game. Short of massive programming efforts, moving data out of IMAGE into an open relational environment meant moving snapshots or point in time data frequently. And then cleaning up the mess left behind by IMAGE’s lack of time stamps and data type checks. BridgeWare takes on those problems and provides IMAGE users an elegant, easy-to-master solution that provides:
- A new GUI Studio workbench that makes managing all but the most complex data movements as simple as point and click.
- Real-time replication of IMAGE, KSAM or MPE data.
- Choice of delta refreshed transactional or bulk data movement.
IMAGE Data Movement is Necessary.
But Not Necessarily Evil.
99% of all data movement projects, including those using IMAGE sources, have exactly the same process and "to-do" list:
- Design the new database tables.
- Build the new database tables.
- Develop a mapping document to show where the data is coming from and what transformations will be needed.
- Write procedures scripts to load the data.
- Find a way to capture changes made to source data.
- Write procedures scripts to apply captured changes to the new database.
Customers have worked with Taurus Software and purchased products from us, because BridgeWare has a great data movement engine, which takes care of Steps 4 and 6. But to implement data movement quicker and easier, customers need a convenient product that does all of the Steps 1 through 6.
The Goal: Working Smarter, Not Harder.
Taurus Software has enhanced BridgeWare by introducing a new module called Studio. BridgeWare is modular with three main components:
- Studio: The graphical workbench that facilitates design of the data movement scripts.
- BridgeWare ETL: The data movement “engine” that resides on all source and target servers.
- BridgeWare Change detection : The component for HP3000 systems that permits delta change captures in IMAGE, KSAM and MPE data structures.
Personally, we think BridgeWare is the greatest invention since the PC. But the proof is in the pudding. This paper will take you through a simple project and prove how easy BridgeWare makes these kinds of projects.
For this project, we will take typical customer data and the related order data over to a relational database on NT. It’s not certain at the beginning whether we will choose Oracle or SQLServer as the database engine. To make it a worst-case scenario, we will assume the data resides in an IMAGE database. Let’s go through the "to-do" list steps:
Step 1. Design the database.
To start the process, we will use Studio, the PC-based development workbench of BridgeWare. From Studio, we can access data sources on any number of machines and begin the design process by creating a virtual mapping of data from the source to target. When we enter Studio for the first time, it looks like this:
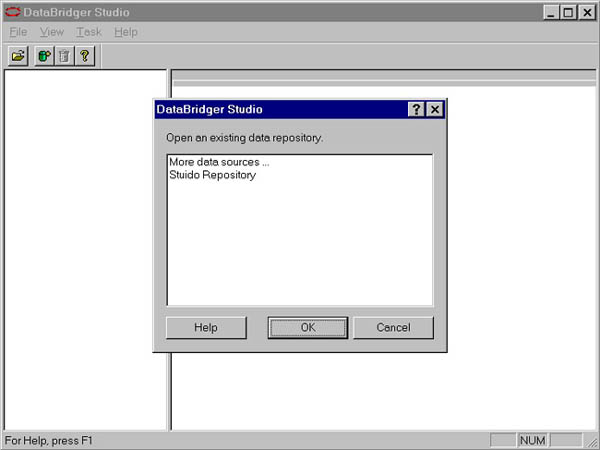
Studio
To begin with, we want customer data, so we connect to the database containing that information. On the toolbar, we click on the  icon. This icon activates a connection wizard to guide us through the process of creating a new data source. We will be asked for a name for the new data source, how to connect to the machine on which it resides, and any other information required to open the data file. Below is a picture of our wizard session for the customer database. icon. This icon activates a connection wizard to guide us through the process of creating a new data source. We will be asked for a name for the new data source, how to connect to the machine on which it resides, and any other information required to open the data file. Below is a picture of our wizard session for the customer database.
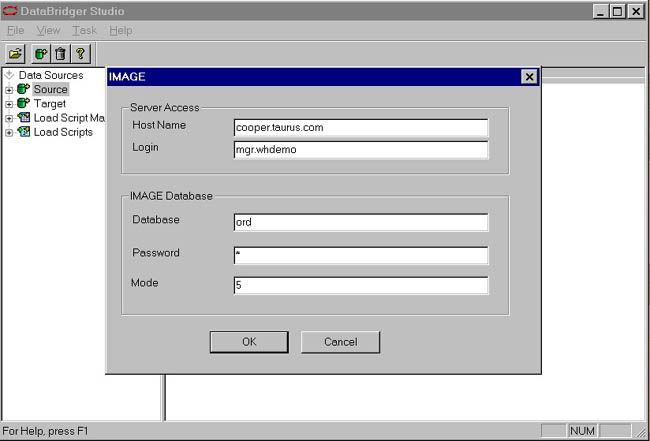
Defining a data source
Once the data source is created, we can see all the datasets or tables are in the database and their structures. The dataset containing the customer information is named CUSTOMERS. Below is the display of the structure.
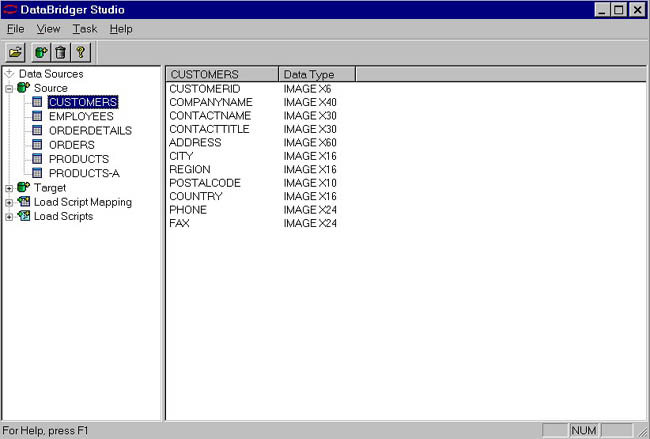
CUSTOMERS dataset Attributes
We can then fashion the new target database tables from the old database. We only need certain data elements from some of the tables, and only certain datasets from the entire database. The process of creating mapping instructions when the target database doesn't exist is called virtual mapping. To create a virtual mapping, select the task virtual mapping from the Task pull-down from the toolbar.

Virtual Mapping
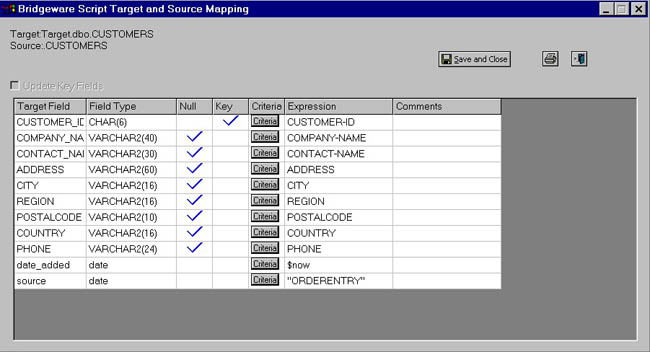
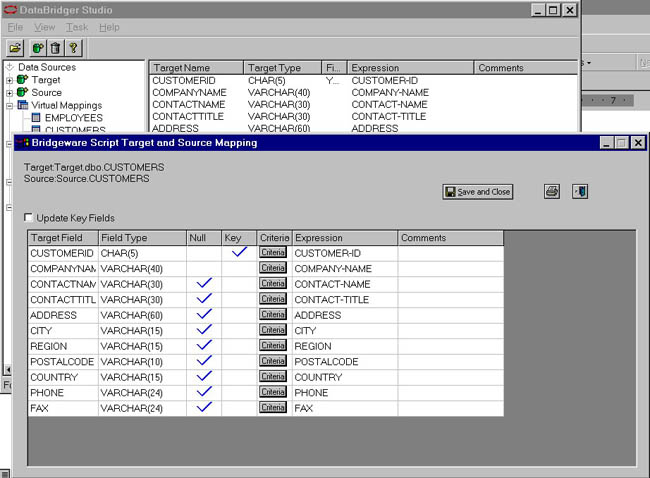
The mapping document is oriented to the target database. The fields on the left are the target columns. The information about those columns is next. Finally, where that data comes from. We will remove unneeded fields in our new database using the  icon. In addition, we want to add some data fields to allow keeping track of when a record was added, both on the original source database and on the target database. To do this, we will the press icon. In addition, we want to add some data fields to allow keeping track of when a record was added, both on the original source database and on the target database. To do this, we will the press  . After our changes, our mapping is as it appears below. Once it is complete, we save and close the mapping. We can continue in this manner until all of the tables are designed. . After our changes, our mapping is as it appears below. Once it is complete, we save and close the mapping. We can continue in this manner until all of the tables are designed.
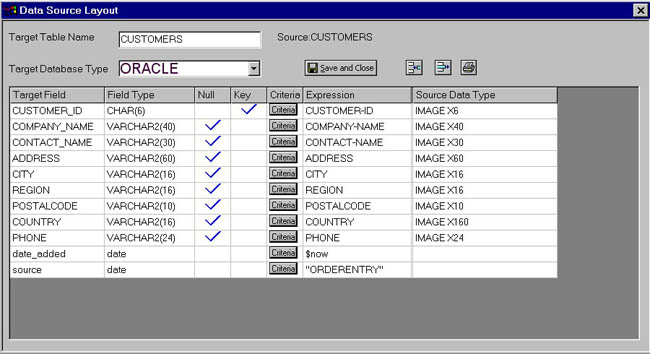
Modified Virtual Mapping
With the mappings, we can create a table, export the mapping document to CSV files for others to review and modify. In our case, we exported the mappings out for others to approve. Naturally, there were changes, so once the modified document was returned, we imported the CSV file back into Studio. To do this, select the mapping and then right click and select import. The screen below shows selecting the importing.

Importing Virtual Mapping
Step 2. Create the database tables.
Happy with the design, we create the table in our new SQL Server database. Once the virtual mapping is done we can automatically generate the table by right clicking on the mapping and selecting CREATE TABLE. Not bad, 30 mouse clicks, and we are done with Steps 1 and 2!
Steps 3 and 4. Create mapping and the initial load procedures.
On to Step 3. Now, we are ready to move on to complete the mapping for the initial load mapping. As you can imagine, even though the bulk of what-comes-from-where is outlined in the virtual mapping, for our testing runs, we may want to filter the data or do additional transformation. In this case, we will modify some of the fixed fields to be initialized to the current date/time. In addition to this, we want to make the company_name fields consistent, making queries easier.
To begin the mapping process, we select Define Initial Load Mapping off the task list. This process will ask where the data is going to and where it is coming from. We can develop the logic through this process from scratch, or we can simply drag and drop the virtual mapping to the initial Load Scripts area.
To modify the mapping, we select it and it opens the mapping for our modification. Below is the mapping before our modifications.
Initial Load Mapping Prior to Modifications
We want to make is to make the COMPANY_NAME fields all uppercase so that Victoria and VICTORIA will yield the same entry. Below is a shot of the expression building for this.
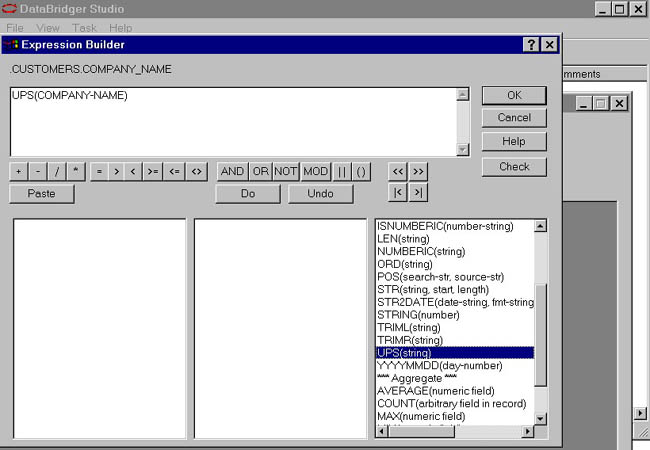
Expression Builder
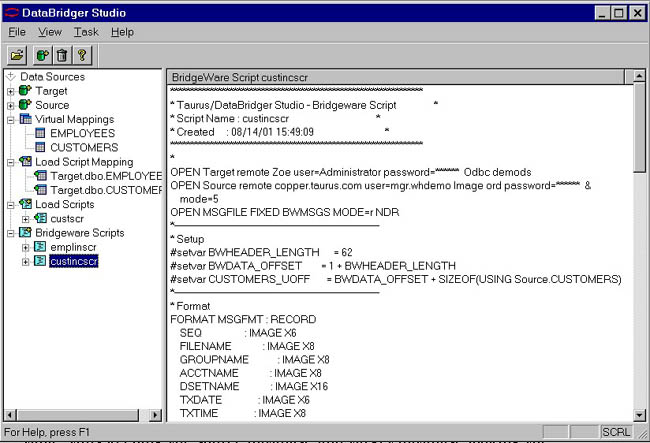
Once we are finished mapping, we can do Step 4, generate the script for initial load. This is easy because, Studio automatically generates the BridgeWare script necessary to move the data from source to target using the transformations we specified in the mappings.
Below is the BridgeWare script that Studio generated.
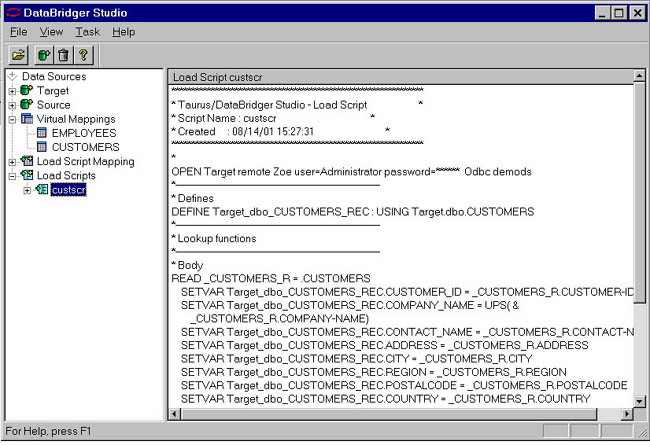
Initial Load Script
To execute this script, we move it to either the source or target machine and use the data movement engine of BridgeWare.
Step 5. Capturing the Changes.
We are now ready to capture changes.
For relational databases, the initial infrastructure within the database allows for capturing changes at various events and points during the writing of the data. If our source database is relational, we would create triggers and then read the trigger data results from the table in which they reside and apply them to our target tables. If triggers is an obstacle with your DBA then you have another alternative to post changes from this environment. Quest Software has API’s that when integrated into your application will allow you to post changes directly to IMAGE, KSAM or MPE files. You could even post to intermediate files and have BridgeWare pick-up the file and process it using the standard transformation, manipulation and cleansing routines.
But life on the HP3000 is not so easy. IMAGE has no such built-in features. Quest Software the HP3000 leader in high-availability and replication captures that information real-time and provides delta refreshes. For several years, Taurus has partnered with Quest Software to use their remarkable capture mechanism. We can configure our capture files the way we want by using BridgeWare's change detect component on the HP3000.
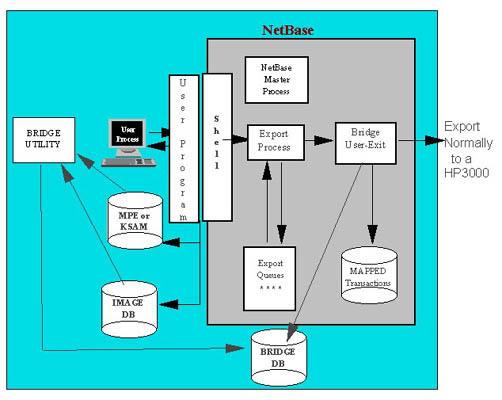
You can create delta capture records real-time for website or OLTP applications and also create delta records for a different application in batch log files to be applied at incremental steps daily, weekly, monthly. The key is delta refreshes the technology only applies what transactions have changed and DOES NOT do a full-scan of the data file and reprocessing of already processed transactions. This is why the overhead is minimal. Below is a diagram that illustrates the capture technology and the transactional image of the before and after image with full timestamp and sequence ordering of transactions.
The capture file that contains our captured transactions is called CUSTTX. Whenever a record in one of the datasets from which we are moving data is added, updated or deleted, a row will be added to the capture file. Along with the raw data will be information about when the data was captured, the name and location of the file from which the data was captured, the date and time it was captured, and the transaction type. Optionally, we could capture information about which program, session, user or job/session number caused the data to be captured. Below are some sample records from our capture file:
Sample Capture Data
463393SFD DATA SFD CUSTOMERS 00022900:56:23IPA12345Taurus Software CAILEAN SHERMAN ACCOUNTS PAYABLE 1032 ELWELL COURT #245 PALO ALTO CA USA (650) 961-1323 (650) 961-1454
463394SFD DATA SFD CUSTOMERS 00022900:56:23IUA12345Taurus Software CAILEAN SHERMAN ACCOUNTS PAYABLE 1032 ELWELL COURT #245 PALO ALTO CA USA (650) 961-1323 (650) 961-1454 Taurus Software CAILEAN SHERMAN ACCOUNTS PAYABLE 1032 ELWELL COURT Suite 245 PALO ALTO CA USA (650) 961-1323 (650) 961-1454
463395SFD DATA SFD CUSTOMERS 00022900:56:23IDA12345Taurus Software CAILEAN SHERMAN ACCOUNTS PAYABLE 1032 ELWELL COURT Suite 245 PALO ALTO CA USA (650) 961-1323 (650) 961-1454
Sample Capture Data
The blue row is an insert transaction. The first information in the record is a sequence number followed by the name, group, and account for the database. Next is the name of the dataset being captured, followed by date, time and type. Notice the type is IP, an IMAGE put. The remaining information is the actual record that was inserted into the CUSTOMERS dataset. The green row is an update transaction. It has the same header record as before, but notice that the transaction type is an IU for IMAGE update. The remainder shows the record before the change, and then what it was changed to. You can see that the address was first 1032 ELWELL COURT #245, and someone changed it to 1032 ELWELL COURT Suite 245. We need to know what it was before the record was changed, so that we can find it in our target database. Finally, the red row is a delete transaction. It also has the same header record as before, but the transaction type is ID for IMAGE delete. The remaining information is the record before it was deleted.
Step 6: Develop incremental procedures.
In Step 6, we use Studio to develop a BridgeWare script that will move these captured transactions and apply them to our target database. This process is as simple as it was to create the initial load BridgeWare script using Studio. However, working with incremental updates is slightly different than the initial loads, as we are working with one record at a time and one transaction type at a time. We want to do different things for different types of transactions.
For example, with an insert we will probably want to do our transformation logic and then insert a new row into the target table. But for an update, we will first want to find the record using the before image, and the update the record using the after image. When creating incremental mappings, we can provide a single mapping for the transformation and then have Studio generate the different logic for an insert, update, and delete and mirror their functions on the target table. Thus, an update transaction does an update to a row on the target table, and a delete transaction deletes a row on the target table.
To begin this process, we select the appropriate task to create the script logic from the task menu. A wizard steps us through the naming of the procedure and prompts for the location of the capture file. Once finished, we jump into a mapping screen, just as we saw for the initial loads. At this point, we can define the field-to-field transformations. A sample mapping looks like this.
Incremental Mapping
Once we save and close the incremental mappings, we can either specify customized logic for each transaction type or let Studio generate standard logic for each transaction type. We don't need to do anything fancy, so we let Studio generate the standard logic. The generated BridgeWare script appears below.
Incremental Script
This BridgeWare script is then moved to either the source or target machine and would be setup to run at whatever frequency our application needs. This code would read the captured transactions and then apply them to our target table, thus keeping the source database and target database looking the same.
Summary: Just That Fast, You’re Done.
As you have seen, in a matter of hours, you can go from having data in a source system to having a new database filled with data and being kept up to date.
Don't get the wrong impression; this was definitely the first pass of the database design and application. As we become more familiar with the real requirements and the types of problems that come up during the data loads (mostly from dirty data), we may want to change the BridgeWare script that was created or even the structure of the database. It is the iterative nature of these types of projects that make it so necessary to have a product with all the components necessary to manage changes easily and quickly.
We hope, through this little exercise, you will be as enamored BridgeWare as we are. Having done projects over the years both with this product and without, we can tell you we will only be doing it the easy way from now on.
|
